Workflow Orchestration - Part 3 (How do I use this?)
In this part of the series, we’ll write some hands-on Temporal code and run it. Let’s start with our requirements:
You need to transmit a data packet. You can choose from multiple Route Providers to do this. Transmission takes time – you will be notified on a callback URL when the packet is delivered. Delivery may fail – either because the acknowledgement was not sent or arrived late (because Internet). You should try the next provider when one fails.
How do you implement this in a truly robust way? Well, let’s write some code and find out! If you want to follow along, you’ll need Go. I’d also recommend running Temporal via docker-compose. (This code has been tested against version 1.8.0.)
Running Temporal via docker-compose is easy, simply run:
git clone https://github.com/temporalio/docker-compose.git
cd docker-compose
docker-compose up
This gives you a local Temporal server on port 7233 and a web UI on port 8088.
If our code works, then it should try multiple routes when one fails. Its output will look something like this:
# The first route provider succeeded
$ go run  $(ls *.go | grep -v test.go) -do submit
2021/04/06 07:26:08 INFO  No logger configured for temporal client. Created default one.
2021/04/06 07:26:10 {
  "Packet": {
    "ID": "00000000-0000-0000-0000-000000000000",
    "Source": "+017771110000",
    "Destination": "+016660002222",
    "Contents": "SGVsbG8=",
    "FailedRouteProviders": null,
    "CurrentRouteProvider": "RouteA",
    "Status": "STATUS_DELIVERED"
  }
}

# The first three routes failed
$ go run  $(ls *.go | grep -v test.go) -do submit
2021/04/06 07:26:12 INFO  No logger configured for temporal client. Created default one.
2021/04/06 07:26:46 {
  "Packet": {
    "ID": "00000000-0000-0000-0000-000000000000",
    "Source": "+017771110000",
    "Destination": "+016660002222",
    "Contents": "SGVsbG8=",
    "FailedRouteProviders": [
      "RouteA",
      "RouteB",
      "RouteC"
    ],
    "CurrentRouteProvider": "RouteD",
    "Status": "STATUS_DELIVERED"
  }
}
Now, for the workflow code. First, let’s examine the main entities of this problem.
// GetRouteActivity asks a routing service to find the next available route provider
func GetRouteActivity(ctx context.Context, in GetRouteIn) (GetRouteOut, error) {...}

// TransmitActivity transmits a packet via the current routing provider
func TransmitActivity(ctx context.Context, in TransmitIn) (TransmitOut, error) {...}

// DataRoutingWorkflow delivers a Packet object to its destination, trying multiple routing providers.
func DataRoutingWorkflow(ctx workflow.Context, in DataRoutingIn) (DataRoutingOut, error) {...}
An Activity is an atomic unit in the Temporal framework. An Activity will be automatically retried on failures. The output of an activity is persisted (like a save point) and a workflow can be resumed from that point forward – even if the process running the workflow itself crashes and was restarted later. As an atomic unit, parallel Activities can also be running on different machines. (Though the scope of this tutorial will be limited to a serial workflow for simplicity.)
A Workflow orchestrates multiple Activity entities. Like any program, a Workflow consists of data (state) and code. The state of a Workflow is built up from a history of events. The code that operates on the current state can be changed while the Workflow is running. For a long running Workflow, such as a machine learning workflow with multiple long-running steps and includes deployment of the model, you can update the workflow logic without having to restart your (long running) process from scratch.
The Transmit Service performs delivery and makes a callback on success. Temporal uses a “task token” to uniquely identify an activity when you want to remotely complete or fail an activity. In our example, we use this token to asynchronously complete the TransmitActivity. We arbitrarily decide to try up to four times to deliver a packet if the asynchrous delivery process fails (or to be precise, fails to ‘ack’ in time).
	// The URL parameter which describes the origin of a request. This is the task token used to signal the activity
	// whether the delivery succeed or failed.
	ParamTaskToken = "task_token"
	// We try at most four times to transmit the packet using different route providers.
	TransmitPacketMaxAttempts = 4
In our example, we’ll program in a 10% chance of network errors when the system tries to call the GetRouteService. This
illustrates how Temporal implements retries for your activities. When simulated network errors occur, we’ll try up to
three times. Our phony GetRouteService returns simply RouteA to RouteE in order.
	// The remote call to return the next route provider has some chance of failing, configured by the environment
	// variable "error_chance".
	GetRouteErrChance = getErrorChance(10, "error_chance")
	// When a service fails, we pretend it failed due to a network error.
	NetworkError = fmt.Errorf("IO Error: network disconnect")
	// When Temporal retries a failed GetRouteActivity call, it will retry up to two times for a total of three
	// attempts.
	GetRouteMaxAttempts = 3
	// The names of the different route providers to choose from.
	PossibleRouteProviders = []string{"RouteA", "RouteB", "RouteC", "RouteD", "RouteE"}
To simulate another source of problems, we’ll simulate the fact that a remote service (the TransmitService) can: 1) Fail
to send an ack on success; or 2) Send the ack late. The TransmitActivity will wait up to 10s (seconds) for an ack, but the
TransmitService may take up to 15s to respond. Oh, and there’s 10% chance that it will not tell us that something
succeeded.
	// The TransmitActivity will timeout after 10 seconds.
	TransmitActivityTimeout = 10 * time.Second

	// The TransmitService has a 90% chance of telling us whether it succeeded or failed.
	TransmitServiceCallbackChance = 90
	// The TransmitService takes up to 15 seconds to make a callback. Note that it might make the callback well after
	// the TransmitActivityTimeout.
	TransmitServiceTimeoutSecs = 15
The Workflow
The main workflow looks like this. It is simply a loop:
- Get the current route provider
- Try to use it for TransmitActivity
- And retries if the packet does not get Delivered.
Remember when we said that the TransmitActivity completes asynchronously via a callback from some remote thing? You won’t know that by looking at the workflow. From the workflow’s perspective, it is not concerned if an activity blocks, is finished asynchronously, or is finished by a human-generated event (a special case of async). The workflow definition is not concerned with implementation details.
	// As long as status != Delivered AND we have not tried MaxAttempts transmits, we will execute the core of the workflow.
	for packet.Status != StatusDelivered && len(packet.FailedRouteProviders) < in.TransmitPacketMaxAttempts {
		....
		if err := workflow.ExecuteActivity(ctx, GetRouteActivity, GetRouteIn{Packet: packet}).Get(ctx, &getRouteOut); err != nil {
			return DataRoutingOut{}, fmt.Errorf("Gave up on GetRouteActivity after %d tries", in.GetRouteMaxAttempts)
		}
		packet.CurrentRouteProvider = getRouteOut.Route
		...
		if err := workflow.ExecuteActivity(ctx, TransmitActivity, TransmitIn{Packet: packet}).Get(ctx, &transmitOut); err != nil {
			msg := fmt.Sprintf("TransmitActivity failed for route provider: %s", packet.CurrentRouteProvider)
			logger.Error(msg, zap.Error(err))
		}
		if !transmitOut.Delivered {
			packet.FailedRouteProviders = append(packet.FailedRouteProviders, packet.CurrentRouteProvider)
			packet.CurrentRouteProvider = ""
		} else {
			packet.Status = StatusDelivered
		}
	}
Oh, we also did something interesting here. The number of times to retry GetRouteActivity is passed as a workflow
parameter, allowing it to be configurable on each execution.
GetRouteActivity
GetRouteActivity is very simple. It calls a remote service via GetRoute(...), which has a 10% chance (configurable)
of returning a network error. An activity returns an error instance to indicate that the Temporal plaform should retry
it.
// GetRouteActivity ask a routing service to find the next available route provider
func GetRouteActivity(ctx context.Context, in GetRouteIn) (GetRouteOut, error) {
	packet := in.Packet
	logger := activity.GetLogger(ctx)
	logger.Info("GetRouteActivity", "packet_id", packet.ID)

	r, err := GetRoute(packet.FailedRouteProviders)
	if err != nil {
		return GetRouteOut{}, err
	}
	return r, nil
}
When does retry occur? Remember when I mentioned Airflow workflow progresses via a scheduler? This means if your scheduler runs once a minute, an Airflow retry cannot happen for at least one minute. Temporal workers are event driven. As soon as a failure event is written to the event stream, a long-polling worker will be notified and may start retrying immediately (assuming the retry policy permits it). “Hold on!” You say, “Isn’t long-polling inefficient?” Not if you use Goroutines.
TransmitActivity
Similar to GetRouteActivity, this activity makes a remote call. While GetRouteActivity blocks on the thread,
TransmitActivity interacts with a remote service asynchronously. We pass in the task token so that the web server can
call us back later. The TransmitActivity returns a special value, ErrResultPending, to indicate that this activity
is waiting for an external signal to complete/fail.
This is where I dislike a particular Go/Temporal’s design idiom, where errors are used as sentinel values – it encourages overloading the error value as both “something had gone wrong” and “special instruction to the calling context”.
// TransmitActivity transmit a packet via the current routing provider
func TransmitActivity(ctx context.Context, in TransmitIn) (TransmitOut, error) {
	logger := activity.GetLogger(ctx)
	logger.Info("TransmitActivity", zap.String("packet_id", in.Packet.ID))
	token := base64.RawURLEncoding.EncodeToString(activity.GetInfo(ctx).TaskToken)
	if err := SubmitToTransmitService(token); err != nil {
		logger.Error("failed to submit data to routing service", zap.Error(err))
		return TransmitOut{}, err
	}
	return TransmitOut{}, activity.ErrResultPending
}
An aside - our mock TransmitService Server
The TransmitService stores a map of “when to call you back” -> “task token” objects. This runs once a second and makes
scheduled callbacks.
	var toDelete []time.Time
	for t, token := range r.callbacks {
		if time.Now().After(t) {
			tokenBytes, _ := base64.RawURLEncoding.DecodeString(token)
			err := r.c.CompleteActivity(context.Background(), tokenBytes, TransmitOut{Delivered: true}, nil)
			if err != nil {
				log.Printf("activity completion error: %v\n", err)
			}
			toDelete = append(toDelete, t)
		}
	}
	for _, t := range toDelete {
		delete(r.callbacks, t)
	}
Testing
So how do you know that your workflow will work as expected? Temporal’s SDK provides comprehensive integration test support. Take a look at activity_workflow_test.go to see how it works.
For example, in this test, we verify that the workflow will look for a new route provider when the first one does not transmit succesfully.
func (s *UnitTestSuite) Test_DataRoutingWorkflow_MultipleTransmit_ok() {
	// The first call to GetRouteActivity returns a route that will fail to transmit.
	// The second call to GetRouteActivity will return a good route.
	getRouteOutSeq := []GetRouteOut{
		{false, "badRoute"},
		{false, "goodRoute"},
	}
	getRouteActivityMock := func(context.Context, GetRouteIn) (GetRouteOut, error) {
		r := getRouteOutSeq[0]
		getRouteOutSeq = getRouteOutSeq[1:]
		return r, nil
	}
	transmitActivityMock := func(_ context.Context, in TransmitIn) (TransmitOut, error) {
		if in.Packet.CurrentRouteProvider == "goodRoute" {
			return TransmitOut{Delivered: true}, nil
		}
		return TransmitOut{Delivered: false}, fmt.Errorf("activity timed out")
	}

	in := DataRoutingIn{
		GetRouteMaxAttempts:       1,
		TransmitPacketMaxAttempts: 2,
	}

	s.env.OnActivity(GetRouteActivity, mock.Anything, mock.Anything).Return(getRouteActivityMock)
	s.env.OnActivity(TransmitActivity, mock.Anything, mock.Anything).Return(transmitActivityMock)

	s.env.ExecuteWorkflow(DataRoutingWorkflow, in)

	s.True(s.env.IsWorkflowCompleted())
	s.NoError(s.env.GetWorkflowError())
	var dataRoutingOut DataRoutingOut
	s.NoError(s.env.GetWorkflowResult(&dataRoutingOut))
	s.Equal([]string{"badRoute"}, dataRoutingOut.Packet.FailedRouteProviders)
	s.Equal("goodRoute", dataRoutingOut.Packet.CurrentRouteProvider)
	s.Equal(StatusDelivered, dataRoutingOut.Packet.Status)
}
You can run your tests like regular Go unit tests.
# Output trimmed for simplicity
18:14 $ go test -v ./
=== RUN   TestUnitTestSuite
=== RUN   TestUnitTestSuite/Test_DataRoutingWorkflow_MultipleTransmit_fail
...
=== RUN   TestUnitTestSuite/Test_DataRoutingWorkflow_MultipleTransmit_ok
...
=== RUN   TestUnitTestSuite/Test_DataRoutingWorkflow_ok
...
--- PASS: TestUnitTestSuite (0.00s)
    --- PASS: TestUnitTestSuite/Test_DataRoutingWorkflow_MultipleTransmit_fail (0.00s)
    --- PASS: TestUnitTestSuite/Test_DataRoutingWorkflow_MultipleTransmit_ok (0.00s)
    --- PASS: TestUnitTestSuite/Test_DataRoutingWorkflow_ok (0.00s)
PASS
ok      jcheng.org/demo/temporal-datarouting    0.007s
Note that your unit tests will not verify…
- GetRouteActivity is retried when the server fails
- Workflow can be resumed from its last point of failure
- Workflow runs can be queried and debugged
… and other operational features of a workflow platform. This is a very powerful feature. By using a workflow platform, you are outsourcing these important behaviors to a trusted third party. Thus, you no longer need to write complicated end-to-end test to verify them. A workflow platform creates a separation of concerns between business requirements and operational requirements. By investing in a workflow platform, you are significantly simplifying what it takes to deliver business value. Trust me, your product managers will love you for it.
Running the workflow
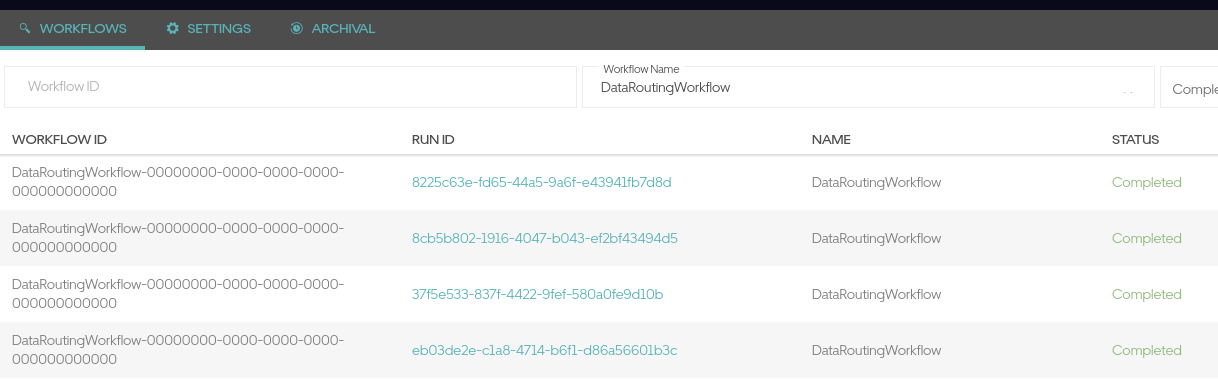
You will no doubt want visibility into your workflows once they are in production. Why did this one fail when that one succeeded? Temporal provides a web UI for managing and debugging your running workflows. Here, we can see the history of a completed workflow:
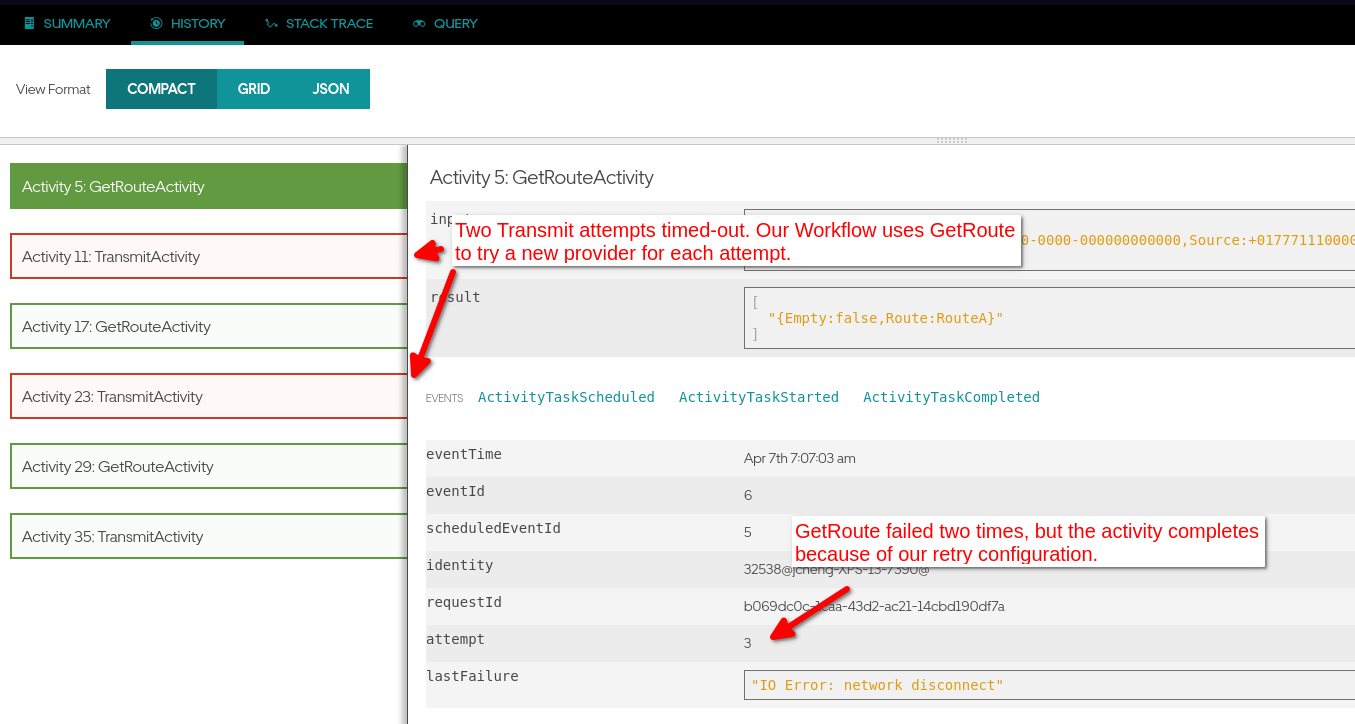
You can even drill down to a more detailed view, which shows you the input and output to each activity invocation.
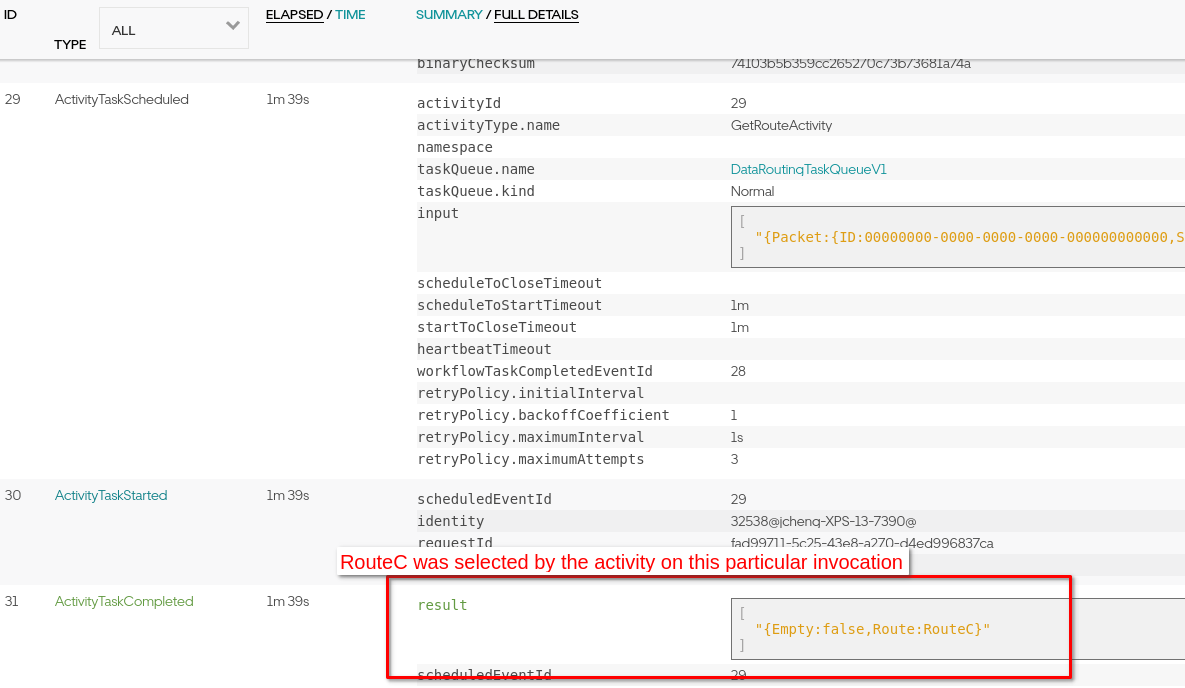
These tools are invaluable when you need to debug production problems, giving you the observability you need to understand what’s happening in your system.
Hopefully you can see why I am so excited about Temporal. It is still a young start-up but it is very promising. The founding team has a wealth of experience. I’m eagerly awaiting public release of their cloud product. I think it’ll be revolutionary.